HP Compaq d530 PSU Repair > How to remove the PSU from a d530 SFF PC
Got the replacement for 308439-001 or 308617-001? Read on to find out how to remove and replace it.
Power Supply Unit Removal
Although the PC has been designed to be mostly tooless when it comes to basic servicing, HP has made it overly difficult to remove and replace proprietary components such as the PSU. HP have made the assumption that the PSU should almost never fail, whilst the motherboard is designed to be easily replaced if it ever does fail. More often than not, the reverse is true - the PSU has a fail rate at least 10 times that of the motherboard!
If you follow these instructions, you will save yourself a lot of hassle trying to figure it out yourself. At most, only about 5 screws need removing. This method also is the least complex, and will take about ten minutes.
Before you start, make sure you have a TORX screwdriver bit that will fit the screws on the back of the d530 PC. You may also need scissors or side cutters to cut a cable tie or two. Other than that, additional tools are not required.
Removal instructions
| Step 1 | Position the d530 PC on a work bench so that the back is facing you. | 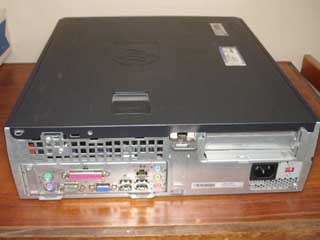 |
| Step 2 | Open and remove the lid (hood) | 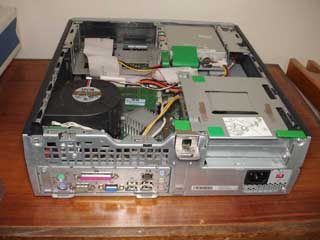 |
| Step 3 | Remove the front plastic cover (the three clips hold it in place). Remove the PCI riser backplane card. | 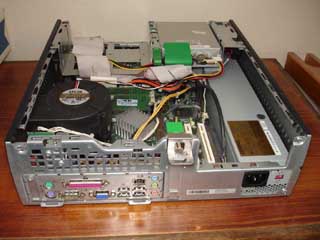 |
| Step 4 | Using a TORX (star) screwdriver bit, remove the screws from the back of the PC. This includes the uppermost left and right, the one at the power supply, and also the ones securing the hood lock. The hood lock uses security TORX screws (they have a centre post), whilst the rest of the screws can be removed using either a torx bit or a flat blade screwdriver. You can opt not to remove the hood lock, if you're careful enough when removing the panel so as not to foul the hood lock PCB onto the side of the casing. | 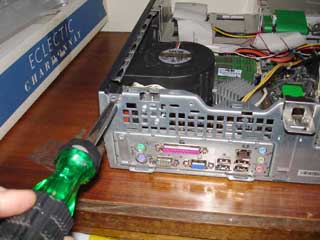 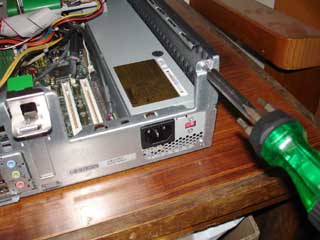  |
| Step 5 | Lift up drive tray | 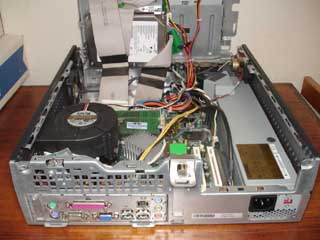 |
| Step 6 | Slide the motherboard out to clear the back panel, by lifting the green release catch and pushing the motherboard back about two centimeters so it lies loose (otherwise the back panel cannot be removed in the next step). | 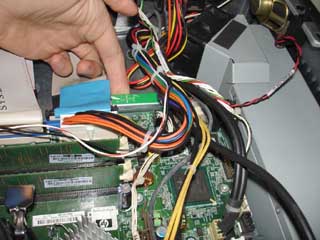 |
| Step 7 | Carefully pull the top of the back panel away. Once it has reached an angle of about 20 degrees, the bottom can be pulled out. Be careful not to damage the copper clips (they help create good electrical contact). |    |
| Step 8 | Remove the black tamper switch (the one with the red and black wires; the switch is above the power supply unit, next to the speaker). | 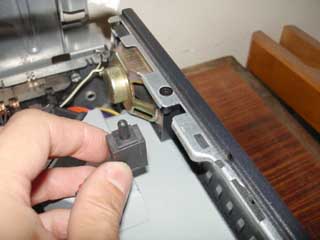 |
| Step 9 | Lift the motherboard up on the left side, and rest it on the side of the case. The other side of the motherboard can rest on the cutouts on the bottom of the case, which will stop the board sliding back down. Try not to lift the motherboard by the centrifugal fan, otherwise you will put excessive strain on the CPU heatsink bracket, which can break. | 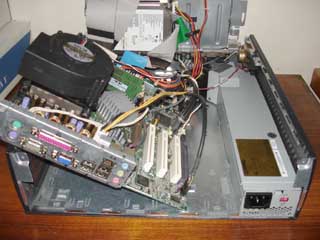 |
| Step 10 | Disconnect the 20-pin ATX, 4-pin 12V and the 2-pin 'Fan Command' cables from the motherboard. | 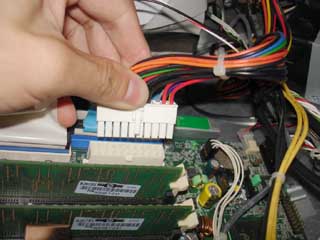 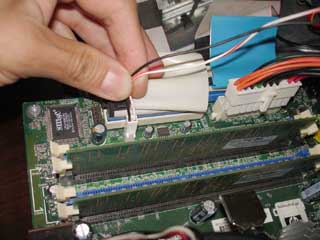 |
| Step 11 | The power supply can now be partially removed by sliding it out. | 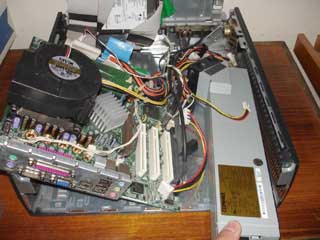 |
| Step 12 | Wiring looms are tied with zip-lock cable ties. On some models, the zip-lock fastener includes a tab, which can be used to release the lock, allowing the cable tie to be opened and re-used later. | 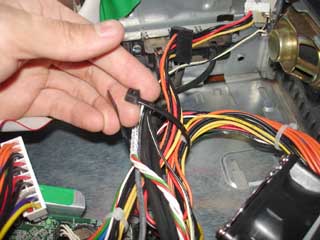 |
| Step 13 | Untangle the power supply wires from the other looms. Remove the power supply. | 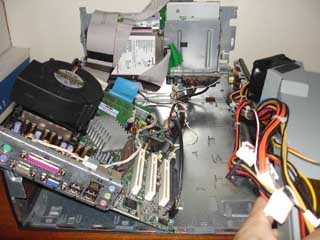 |
Re-installation of the replacement
Once you have your replacement unit, re-installation is the reverse of the above. Be certain that none of the wires get poked into the fan grille of the PSU. If the PSU fan is jammed, it will overheat and blow up again!
D-bug, Sat, 15 Aug 2009 12:37 am: Reply
Jaycee, Sun, 16 Aug 2009 08:55 pm: Reply
Steve, Wed, 19 Aug 2009 05:57 am: Reply
Eugene, Wed, 26 Aug 2009 04:06 am: Reply
David, Thu, 03 Sep 2009 06:02 am: Reply
Rach, Fri, 04 Sep 2009 01:15 pm: Reply
HLee, Sat, 05 Sep 2009 04:22 pm: Reply
Danny, Wed, 09 Sep 2009 03:35 pm: Reply
billy, Thu, 10 Sep 2009 02:04 am: Reply
kevfern, Thu, 17 Sep 2009 06:28 am: Reply
r gray, Fri, 25 Sep 2009 07:31 pm: Reply
smac, Thu, 22 Oct 2009 09:33 pm: Reply
Thank you!, Tue, 03 Nov 2009 06:55 am: Reply
rodge, Wed, 04 Nov 2009 02:46 pm: Reply
Tony Phillips, Sat, 21 Nov 2009 02:37 pm: Reply
Jim, Tue, 24 Nov 2009 09:40 am: Reply
Stewart, Wed, 02 Dec 2009 02:08 am: Reply
ted, Sun, 27 Dec 2009 08:44 am: Reply
khan, Mon, 11 Jan 2010 03:02 pm: Reply
jb, Thu, 14 Jan 2010 09:06 am: Reply
MXM, Wed, 03 Feb 2010 08:49 am: Reply
Rashmi, Wed, 10 Feb 2010 03:41 am: Reply
DBCC, Fri, 12 Feb 2010 10:08 pm: Reply
Hyder, Sat, 13 Feb 2010 07:21 pm: Reply
Montana, Fri, 12 Mar 2010 01:29 am: Reply
Corey, Tue, 30 Mar 2010 12:02 pm: Reply
Carel, Wed, 14 Apr 2010 03:56 am: Reply
Carel, Wed, 14 Apr 2010 03:56 am: Reply
Scott, Fri, 23 Apr 2010 06:15 am: Reply
Hyder, Mon, 26 Apr 2010 01:40 pm: Reply
Martijn, Thu, 06 May 2010 07:22 am: Reply
jayne, Sat, 22 May 2010 09:27 am: Reply
Raksha, Wed, 02 Jun 2010 02:39 am: Reply
thomaswww, Sat, 05 Jun 2010 05:46 am: Reply
BOB, Thu, 10 Jun 2010 08:09 pm: Reply
FARLIVE, Tue, 22 Jun 2010 09:58 am: Reply
Rafi, Wed, 23 Jun 2010 11:20 am: Reply
saleem, Wed, 07 Jul 2010 11:25 pm: Reply
Mark Lorenzi, Wed, 14 Jul 2010 02:54 am: Reply
peter from holland, Tue, 24 Aug 2010 06:35 pm: Reply
SKEET, Fri, 03 Sep 2010 05:01 am: Reply
cathy, Fri, 03 Sep 2010 06:26 am: Reply
Phill, Wed, 15 Sep 2010 07:45 pm: Reply
phillyitsales, Mon, 25 Oct 2010 10:08 am: Reply
M Waddington, Tue, 26 Oct 2010 09:12 pm: Reply
Amateur, Tue, 02 Nov 2010 02:42 pm: Reply
Juan, Fri, 12 Nov 2010 02:46 am: Reply
Rich, Thu, 02 Dec 2010 05:47 am: Reply
james lansford, Thu, 02 Dec 2010 06:38 am: Reply
newton, Tue, 04 Jan 2011 07:51 pm: Reply
mcb0, Sat, 08 Jan 2011 09:31 pm: Reply
Wayne S, Tue, 01 Mar 2011 05:14 am: Reply
Allan, Tue, 08 Mar 2011 11:58 pm: Reply
Sean P., Sun, 20 Mar 2011 02:46 am: Reply
Peter Stevens, Fri, 08 Apr 2011 04:56 pm: Reply
KFONG6932, Sun, 10 Apr 2011 09:02 am: Reply
Simon, Thu, 26 May 2011 09:08 pm: Reply
JayEron, Sat, 28 May 2011 05:34 am: Reply
JayEron, Sat, 28 May 2011 05:34 am: Reply
Gavian G, Thu, 21 Jul 2011 10:49 am: Reply
Ajay, Sat, 23 Jul 2011 12:58 am: Reply
JMR, Sat, 06 Aug 2011 04:45 pm: Reply
FCP, Sun, 07 Aug 2011 07:39 am: Reply
Andy, Tue, 09 Aug 2011 04:38 pm: Reply
Mark G-J, Fri, 12 Aug 2011 05:07 am: Reply
Filix, Tue, 20 Sep 2011 06:44 am: Reply
Raul Chu, Sun, 25 Sep 2011 10:34 am: Reply
Rob, Thu, 15 Dec 2011 12:54 pm: Reply
DJK, Wed, 04 Jan 2012 02:00 am: Reply
mmd, Sun, 15 Jan 2012 11:31 am: Reply
Chris, Mon, 16 Jan 2012 02:14 am: Reply
Chas, Wed, 25 Jan 2012 02:38 pm: Reply
Mike G, Mon, 30 Jan 2012 11:53 pm: Reply
Mike G, Tue, 31 Jan 2012 11:33 am: Reply
Rick G., Tue, 27 Mar 2012 05:30 am: Reply
Ian. S, Fri, 30 Mar 2012 01:13 pm: Reply
Yusuf, Thu, 26 Apr 2012 04:12 pm: Reply
JPN, Sun, 06 May 2012 08:34 pm: Reply
David, Mon, 04 Jun 2012 09:09 am: Reply
awais, Fri, 22 Jun 2012 04:21 pm: Reply
mughal, Fri, 22 Jun 2012 04:23 pm: Reply
jimi, Mon, 16 Jul 2012 08:47 pm: Reply
Don S, Tue, 13 Nov 2012 03:12 pm: Reply
Tanveer, Tue, 13 Nov 2012 08:01 pm: Reply
Blake,E, Fri, 14 Dec 2012 12:48 pm: Reply
Eric R, Sat, 05 Jan 2013 05:37 am: Reply
Tim Walls, Wed, 23 Jan 2013 04:56 am: Reply
Doug, Thu, 24 Jan 2013 04:30 pm: Reply
Tasos. Mulder, Sat, 26 Jan 2013 03:39 am: Reply
Bray Ochukwu, Tue, 30 Apr 2013 07:25 am: Reply
Mike, Mon, 17 Jun 2013 02:32 am: Reply
zack, Mon, 05 Aug 2013 05:57 pm: Reply
Stone, Mon, 22 Sep 2014 06:10 pm: Reply
jpflemington, Fri, 24 Apr 2015 05:46 pm: Reply
Christine, Sat, 13 Jun 2015 09:39 am: Reply
Omar, Tue, 02 Feb 2016 08:55 am: Reply
Jeff, Wed, 13 Jun 2018 05:26 pm: Reply